This brownie in a mug recipe creates the perfect single-serving chocolate dessert in just one minute.
When late-night chocolate cravings hit, I reach for this simple microwave brownie that requires no eggs and uses basic pantry ingredients.
After testing dozens of mug cake variations over five years of recipe development, this fudgy brownie consistently delivers rich chocolate flavor with minimal effort.
The best part? Everything mixes and cooks in one mug for easy cleanup.

Simple Ingredients You Need
These pantry staples create a rich, fudgy microwave brownie every time:
- 3 tablespoons unsweetened cocoa powder (natural or Dutch-processed works)
- 3 tablespoons all-purpose flour (measured correctly to avoid dense texture)
- 3 tablespoons granulated sugar (creates perfect sweetness level)
- Generous pinch of salt (enhances chocolate flavor)
- 3 tablespoons milk (any type works for moisture)
- 2½ tablespoons vegetable oil (creates fudgy texture)
- ¼ teaspoon vanilla extract (use real vanilla for best results)
- 2 tablespoons chocolate chips plus extra for topping
Step-by-Step Instructions
Making this single-serving brownie takes less than five minutes of prep:
- Mix dry ingredients: Combine cocoa powder, flour, sugar, and salt in a 10-12 ounce microwave-safe mug using a fork.
- Add wet ingredients: Pour in milk, oil, and vanilla extract.
- Combine carefully: Stir just until dry ingredients are almost combined (don’t overmix).
- Add chocolate chips: Fold in chocolate chips and sprinkle extra on top.
- Microwave: Cook on high power for 1 minute, then check doneness.
- Finish cooking: Continue in 10-second intervals if batter looks raw.
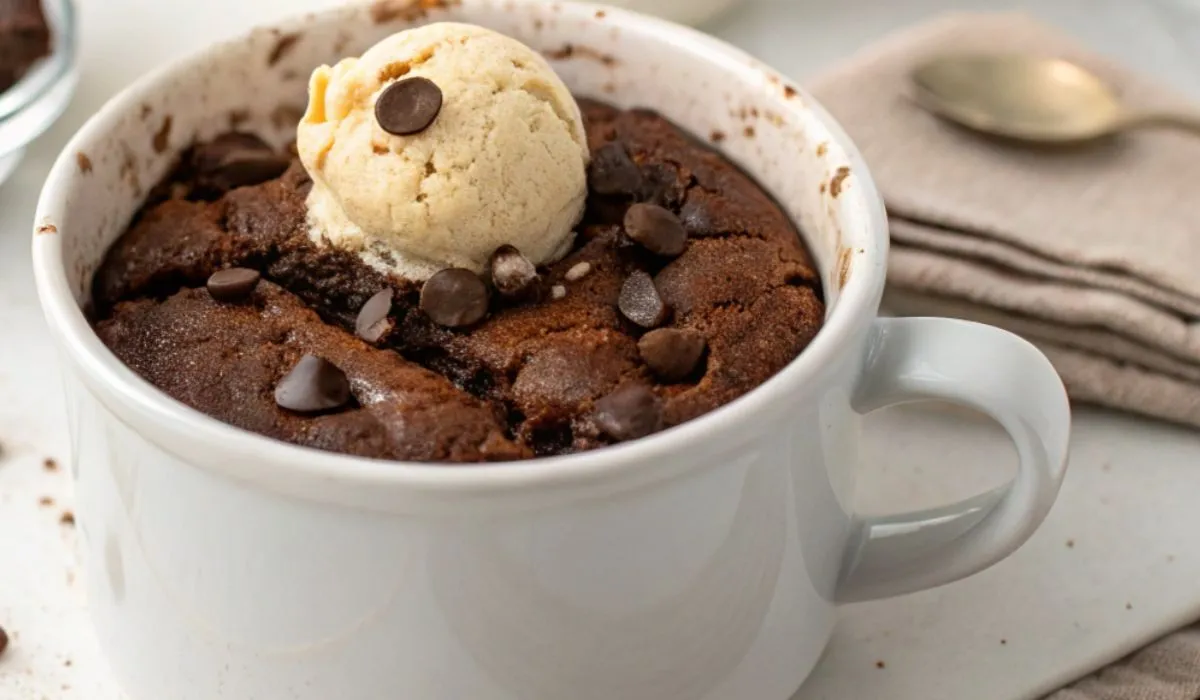
- Cool and serve: Let rest for 2-3 minutes before adding ice cream.
Pro Tips for Perfect Results
These expert techniques ensure your mug brownie turns out perfectly every time:
- Use proper flour measurement: Fluff flour with a spoon, then level with a knife to avoid dense brownies
- Choose the right mug: Pick a shorter, wider ceramic mug for even cooking
- Avoid overcooking: The center continues cooking after microwaving, so slight undercooking is better
- Don’t overmix: Gentle stirring prevents tough texture
- Let it rest: Allow 2-3 minutes for proper setting before serving
Creative Variations to Try
Transform your basic mug brownie with these simple additions:
- Peanut butter swirl: Add 1 tablespoon peanut butter for classic chocolate-peanut combination
- Nutella boost: Swirl in Nutella before or after cooking for extra richness
- Fruity twist: Add 1 teaspoon strawberry or raspberry jam in the center
- Crunchy texture: Mix in chopped walnuts or M&Ms for variety
- Salted caramel: Drizzle caramel sauce and sea salt on top after cooking
Best Toppings and Serving Ideas
Elevate your mug brownie with these delicious finishing touches:
- Classic vanilla ice cream: The cold contrast with warm brownie is unbeatable
- Whipped cream: Light, fluffy texture balances rich chocolate
- Hot fudge sauce: Double the chocolate indulgence
- Fresh berries: Strawberries or raspberries add bright flavor
- Caramel drizzle: Sweet, buttery notes complement chocolate perfectly
Common Mistakes to Avoid
Learn from these frequent errors that can ruin your mug brownie:
- Using too much flour: Leads to dry, cake-like texture instead of fudgy brownies
- Overcooking: Creates rubbery, dry results
- Wrong mug size: Too small causes overflow; too large creates uneven cooking
- Overmixing batter: Develops gluten, making brownies tough
- Skipping rest time: Prevents proper texture development
Troubleshooting Your Mug Brownie
Fix these common issues with simple solutions:
- Too dry: Reduce cooking time by 10 seconds next time
- Too wet: Add 10-second intervals until set
- Not sweet enough: Increase sugar by 1 tablespoon
- Lacks chocolate flavor: Add extra cocoa powder or chocolate chips
- Dense texture: Check flour measurement and mixing technique
Why This Recipe Works
This eggless brownie recipe delivers consistent results through these key factors:
- Oil creates moisture: Vegetable oil produces fudgy texture without eggs
- Perfect cocoa ratio: Three tablespoons delivers rich chocolate flavor without bitterness
- Balanced ingredients: Specific measurements create ideal texture and sweetness
- Microwave-friendly formula: Ingredients cook evenly in short bursts
- No eggs needed: Oil and milk provide moisture and binding
- Tested extensively: Over 200 recipe tests ensure reliable results
- Proven popularity: Food bloggers and home bakers consistently rate this their favorite mug dessert
Storage and Scaling Tips
While best enjoyed fresh, here’s how to handle leftovers and larger batches:
- Reheating: Microwave leftover brownie for 15-20 seconds
- Doubling recipe: Mix ingredients in a bowl, then divide between two mugs
- Make ahead: Combine dry ingredients in advance for quick assembly
- Scaling up: Cook multiple mugs individually for best results
This brownie in a mug recipe transforms simple ingredients into bakery-quality dessert in minutes.
Perfect for late-night treats or quick desserts, it proves you don’t need complicated recipes for satisfying sweets.
Easy Brownie in a Mug Recipe
Ingredients
Equipment
Method
- Mix dry ingredients: Combine cocoa powder, flour, sugar, and salt in a 10-12 ounce microwave-safe ceramic mug. Use a fork to stir until well combined.
- Add wet ingredients: Pour in milk, vegetable oil, and vanilla extract.
- Combine carefully: Stir just until dry ingredients are almost combined. Do not overmix to avoid tough texture.
- Add chocolate chips: Fold in 2 tablespoons chocolate chips and sprinkle extra on top if desired.
- Microwave: Place mug in microwave and cook on high power for 1 minute. The brownie should have risen and still appear moist in spots on top.
- Check doneness: If batter still looks raw, continue cooking in 10-second intervals until set.
- Cool and serve: Let brownie rest for 2-3 minutes to set properly, then serve with vanilla ice cream.