Finding the perfect paper mache recipe can transform your crafting projects from messy disasters into beautiful works of art.
I’ve been making paper mache sculptures and masks for over a decade, and I’ve tested every paste combination you can imagine.
After countless hours of mixing, molding, and creating, I’ve discovered which recipes work best for different projects.
Whether you’re helping your child with a school assignment or creating your own artistic masterpiece, these tried-and-true recipes will give you strong, smooth results every time.
Essential Ingredients for Paper Mache
The beauty of paper mache lies in its simplicity. Here are the basic ingredients you’ll need:
- All-purpose white flour (avoid whole wheat)
- Hot tap water (not boiling)
- White PVA glue (like Elmer’s Glue-All)
- Wood glue (for stronger projects)
- Methylcellulose powder (gluten-free option)
- Small saucepan and whisk
- Measuring cups and spoons
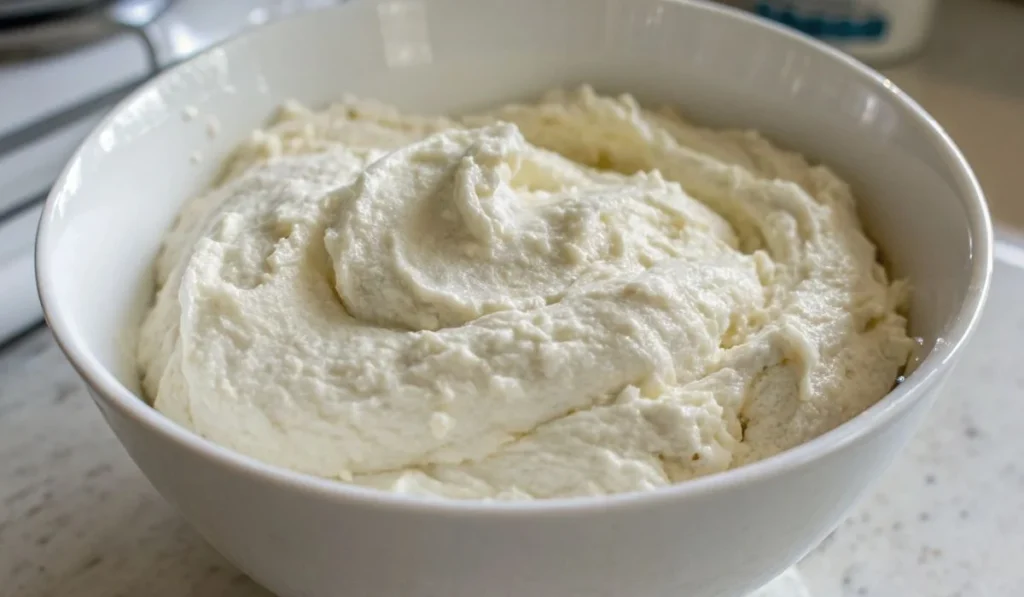
Basic Flour and Water Recipe
This is my go-to recipe for most projects. I’ve used it for everything from piñatas to decorative bowls:
- Pour white flour into a mixing bowl
- Add hot tap water gradually while stirring
- Mix until you reach a consistency like white glue
- Use an immersion blender for ultra-smooth results
- Apply immediately with paper strips
The paste should flow easily but not be watery. Think of it as slightly thicker than heavy cream.
I learned this consistency through trial and error during my first sculpture project years ago.
Cooked Flour Paste Method
When you need a cleaner finish, this cooked version dries almost clear:
- Mix 2 tablespoons white flour with 1 cup cold water
- Whisk until completely smooth with no lumps
- Heat on medium while stirring constantly
- Bring to a gentle boil, watching carefully
- Remove from heat when it starts bubbling
- Let cool before using
This method takes more effort, but the results are worth it. The surface stays smoother, and you won’t see white flour residue on your finished piece.
Gluten-Free Alternatives
As someone who teaches crafting classes, I’ve had students with gluten allergies. These options work perfectly:
- Mix Elmer’s Glue-All with small amounts of water
- Thin until it spreads easily with a brush
- Apply in thin, even layers
- Allow each layer to dry completely
For methylcellulose paste:
- Mix food-grade methylcellulose powder with water
- Follow package directions for consistency
- Store covered for up to a week without molding
- Use like traditional flour paste
Wood Glue for Strong Projects
I discovered this method while making masks that needed to be lightweight but durable:
- Use Titebond III wood glue straight from the bottle
- Apply thin layers with a brush
- Work quickly as it dries faster than flour paste
- Perfect for single-layer applications over cardboard
- Creates incredibly strong, flexible results
This technique costs more but saves time since you need fewer layers. I use it for all my costume masks now.
Application Tips and Techniques
Getting smooth results requires proper technique. Here’s what I’ve learned from years of practice:
- Tear paper strips instead of cutting them for better blending
- Dip strips completely but squeeze out excess paste
- Overlap each strip by about half its width
- Smooth out air bubbles with your fingers
- Work in thin layers rather than thick ones
The key is patience. I used to rush and add thick layers, which led to cracking and uneven surfaces. Thin layers dry faster and look much better.
Storage and Safety Guidelines
Proper storage prevents waste and keeps your workspace safe:
- Make only what you need for one session
- Throw away leftover flour-based paste immediately
- Clean tools before paste dries hard
- Store glue-based pastes covered for up to a week
- Work in well-ventilated areas
I learned about the storage rule the hard way when my paste developed an awful smell after sitting overnight. Wild yeast loves flour, so fresh batches work best.
Troubleshooting Common Problems
Even experienced crafters run into issues. Here’s how to fix them:
- Lumpy paste: Use hot water and whisk thoroughly
- Too thick: Add small amounts of water gradually
- Too thin: Sprinkle in more flour while stirring
- Cracking while drying: Apply thinner layers next time
- Rough surface: Switch to cooked flour paste for smoothness
Project-Specific Recipe Recommendations
Different projects need different approaches:
- School projects and piñatas: Use basic flour and water recipe
- Decorative sculptures: Try cooked flour paste for smooth finish
- Masks and costumes: Wood glue offers strength and flexibility
- Allergy concerns: Stick with glue-based or methylcellulose options
- Large sculptures: Flour paste works well for multiple sessions
After years of experimenting, I can confidently say that mastering paper mache starts with choosing the right recipe for your specific project.
These tested methods will help you create professional-looking results while keeping the process simple and enjoyable.

Basic Paper Mache Paste Recipe
Ingredients
Equipment
Method
- Pour the white flour into a mixing bowl. Make sure you’re using all-purpose flour, not whole wheat, as it won’t be sticky enough.
- Add hot tap water gradually while stirring continuously. The hot water helps create a smoother paste consistency.
- Mix with a whisk or spoon until you reach a consistency similar to white glue. The paste should flow easily but not be watery.
- For ultra-smooth results, use an immersion blender to eliminate any remaining lumps.
- Use immediately with paper strips for your paper mache project. Apply thin, overlapping layers for best results.
- Discard any leftover paste after your crafting session, as flour-based pastes can develop mold if stored overnight.